How to import
custom LUTs
Bring your signature color grading to Phocus. Import your custom LUT images and see the results in real-time through your camera viewfinder.
What are LUTs?
LUT stands for "Look Up Table" — a file that maps input colors to output colors to transform the appearance of your photos. Professional photographers and filmmakers use LUTs to achieve consistent color grading across their work.
- PNG
- The recommended format. Square PNG LUT images provide lossless color data for the most accurate color transformations.
- JPG
- Also supported. JPG LUT images are smaller in file size but may have slight compression artifacts in color mapping.
Create your own LUT
Start from a neutral identity LUT — a square PNG that maps every input color to itself. Open it in your favorite editor, apply the same color grading you'd use on a photo, then export the result as a PNG or JPG. That's your custom LUT, ready to import into Phocus.
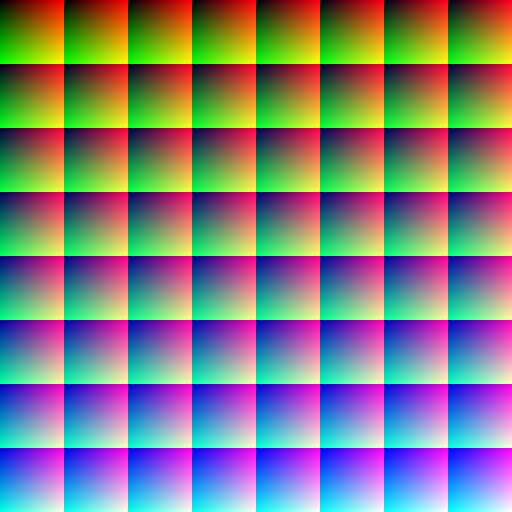
Neutral LUT · 512×512 PNG
Use this as the starting point. Any edits you make to this image translate directly into a LUT Phocus can read.
Download neutral LUTWorkflow in any photo editor
Open the neutral LUT as an image
Treat the PNG like any photo. Don't crop, resize, rotate, or apply blur, sharpening, or noise — those will warp the color mapping.
Apply your color grade
Use curves, levels, color balance, HSL, white balance, split toning, or any global color adjustment. Stick to operations that act on color — skip anything spatial.
Export as PNG or JPG
Save the modified image at the original 512×512 size. PNG is recommended for the most accurate result.
Import into Phocus
Send it to your iPhone and use one of the import methods below.
Compatible programs
- Adobe Photoshop
- Open the PNG, then use Image → Adjustments (Curves, Hue/Saturation, Color Balance) or stack adjustment layers. Flatten and export as PNG.
- Adobe Lightroom
- Import the neutral LUT as a photo and edit it like any image — tone curve, HSL, color grading, white balance. Export as a 512×512 PNG with no sharpening or noise reduction.
- Photomator
-
Edit the LUT directly with color tools, or — handy trick — apply
an existing
.cubefile to the neutral PNG and export the result. That converts any 3D LUT into a square PNG Phocus can read. - Capture One
- Import as a session image and use Color Balance, Curve, and Color Editor. Export as a 512×512 PNG with sharpening and clarity set to zero.
- Affinity Photo
- Open the PNG and stack adjustment layers (Curves, HSL, Recolor, Channel Mixer). Flatten and export as PNG at the original size.
- Darktable
- Free and open source. Import the LUT, apply color modules (tone curve, color balance RGB, color zones), and export as PNG without output sharpening.
- GIMP
- Use Colors → Curves, Color Balance, Hue-Saturation. Export the flattened image as PNG. Free alternative if you don't have access to commercial editors.
- Snapseed & mobile editors
- Open the neutral PNG on your phone, use Tune Image, White Balance, Curves, and Selective. Save and import directly into Phocus — never leaving the device.
Import methods
Import from Files app
Open Phocus and go to Settings
Tap the gear icon in the top-right corner of the main camera screen to access Settings.
Navigate to "Custom LUTs"
Scroll down to the "Filters" section and tap on "Custom LUTs" to open the LUT manager.
Tap the "+" button
This will open the iOS Files picker. Navigate to where your LUT images are stored.
Select your LUT image
Tap on the PNG or JPG square LUT image you want to import. The file will be processed and added to Phocus.
Name your LUT (optional)
Give your LUT a memorable name so you can easily find it later in the filter list.
Import via Share Sheet
Find your LUT image
Locate the square LUT PNG or JPG in Safari downloads, email attachments, or any other app.
Tap the Share button
Look for the share icon (square with an arrow pointing up) and tap it.
Select "Phocus" from the list
Scroll through the share options and tap on the Phocus icon. The LUT will be imported automatically.
Sync via the iCloud Luts folder
Open the Luts folder
In Phocus, tap "Import LUTs" and then "Open Luts folder" — it
jumps straight to the Phocus/Luts folder in iCloud
Drive. You can also reach it from the Files app under iCloud
Drive → Phocus → Luts.
Drop in your LUT images
Add your square PNG or JPG LUT files to the folder. From a Mac, drag them into the same iCloud folder in Finder — no cables or AirDrop needed.
Let it sync automatically
iCloud syncs the folder across your devices and Phocus picks up new LUTs on its own. Add, rename, or delete files anytime — the filter list stays in sync.
Using your imported LUTs
Once imported, your custom LUTs appear alongside the built-in filters in Phocus.
- Access from the camera
- Open the camera in Phocus and swipe through the filter carousel. Your custom LUTs appear in a separate "My LUTs" section at the end of the list.
- Real-time preview
- Just like built-in filters, your custom LUTs are applied in real-time to the camera viewfinder so you can see exactly how your photo will look before capturing.
- Adjust intensity
- Use the intensity slider to control how strong the LUT effect is applied. This works with both built-in filters and your custom LUTs.
Managing your LUTs
All imported LUTs live in the Phocus/Luts folder inside
iCloud Drive. Open the Files app, navigate there, and you can rename,
delete, reorder, or add new LUTs at any time — changes sync back to
Phocus automatically.
Troubleshooting
My LUT image won't import
Make sure your file is a valid 512×512 square LUT image in PNG or JPG format. Phocus only supports this size. If your LUT is in a different format (like .cube or .3dl), you'll need to convert it to a 512×512 square LUT image first using compatible software.
The LUT looks different than expected
LUTs are designed for specific input color profiles. If your LUT was designed for log footage (like S-Log or C-Log), it may look overly contrasty when applied to standard iPhone photos. Try reducing the intensity slider, or look for LUTs specifically designed for Rec. 709 or sRGB input.
I can't find my imported LUT
Custom LUTs appear in a separate section called "My LUTs" at the end of the filter carousel. Swipe all the way to the right to find them. You can also access them from Settings > Custom LUTs.
Ready to try it out?
Grab the neutral LUT to start crafting your own look, or download Phocus and bring your existing LUTs along.